
Cold spots on internal walls can feel uncomfortable, but they may also point to an underlying building problem. A patch that feels colder than the surrounding surface could be caused by heat escaping through the structure, damp affecting the wall, draughts around openings or moist air condensing on a cool area.
The right solution depends on the cause, so it is worth carrying out a few simple checks before arranging work. Use the guide below to narrow down the likely source and decide when professional advice is needed.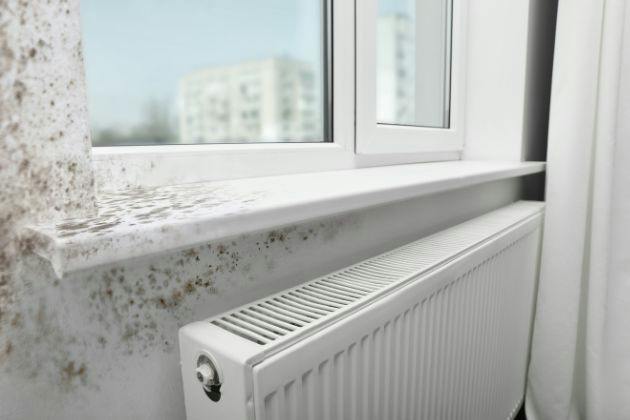
Common causes of cold patches
Thermal bridging at lintels and joists
A thermal bridge is an area where heat travels through a building more easily than it does through the surrounding wall. Common examples include steel or concrete lintels above windows and doors, wall junctions, corners and the ends of floor or ceiling joists.
These areas can feel noticeably colder in winter and may develop small patches of condensation or mould. Thermal bridging can be difficult to eliminate without altering the construction, but improving airflow, reducing indoor moisture and addressing related insulation gaps can often help.
Missing, settled or disturbed insulation
Insulation can be missing from part of a cavity wall, compressed over time or moved by previous building work. In lofts, insulation may be thin, uneven or absent around the edges, creating colder sections on the ceilings and upper parts of walls.
Cold areas that follow a straight vertical or horizontal line may indicate a gap in insulation or a structural junction. However, a cold wall does not automatically mean insulation is the only problem, particularly if there are signs of moisture or staining.
Damp affecting the wall
Damp materials generally perform less effectively as insulation, so a wet or moisture-affected wall can feel colder than a dry one. Look for peeling paint, tide marks, salt deposits, musty smells, bubbling plaster or patches that become worse after rain.
Possible sources include leaking gutters and pipes, damaged pointing, plumbing leaks, defective flashing or moisture entering through cracks. Rising damp and penetrating damp can look similar from inside, so avoid simply painting over the patch before the source has been identified.
Gaps around windows, doors and services
Small gaps around window frames, external doors, skirting boards and pipes can allow cold air into the room. A draught may make one section of wall feel cold even when the wall itself has adequate insulation.
On a windy day, carefully feel around frames and service openings, or use a smoke pencil if you have one. Do not block trickle vents or intentional airbricks, as these provide controlled ventilation and help manage moisture.
Blocked ventilation and condensation
Everyday activities such as cooking, showering and drying clothes add moisture to indoor air. If extractor fans, airbricks or trickle vents are blocked or ineffective, that moisture can settle on colder wall surfaces and create damp-looking patches.
Condensation is more likely in bedrooms, bathrooms and behind furniture placed tightly against external walls. It may appear as black spotting, water droplets or a damp-feeling surface, especially during colder months.
A room-by-room cold spot checklist
Walk through the property on a cold day and compare the affected area with nearby walls. Note whether the patch is near an opening, roof edge, floor junction or plumbing, and record any changes after rainfall or increased heating.
Bedrooms: Check behind wardrobes and beds for condensation, mould and restricted airflow.
Living rooms: Inspect chimney breasts, external corners, skirting boards and window reveals.
Kitchens and bathrooms: Test extractor fans and look for moisture, staining or failed sealant.
Lofts and top-floor rooms: Check for uneven loft insulation, draughts and cold ceiling edges.
Ground floors: Look for skirting-level staining, damaged plaster and possible plumbing or rainwater issues.
What to do next
Start with simple changes, but use the pattern and condition of the cold spot to guide your next step. A short period of observation can provide useful evidence for a contractor.
Improve ventilation and heating patterns: Use kitchen and bathroom extractors during and after moisture-producing activities, keep trickle vents open and heat rooms consistently rather than allowing them to become very cold. Leave space between furniture and external walls.
Check for water ingress: Inspect gutters, downpipes, roof details, external joints and nearby plumbing. Photograph stains and note whether the patch becomes worse after rain.
Arrange a professional assessment: If the patch persists, returns after cleaning or is accompanied by mould, staining or a musty smell, obtain an inspection. Specialist checks may be needed for damp, cavity wall defects, thermal bridging or loft heat loss.
Be cautious with quick fixes. Waterproof coatings, injected products or additional insulation may not solve the problem if water is still entering the wall or ventilation remains poor.
Choose the right specialist support
Persistent damp or patchy walls should be assessed before repair work begins. Cavi Clear Ltd can help homeowners identify the appropriate route, whether the concern is moisture, a possible cavity issue or heat escaping through the loft.
For damp or patchy walls, ask about damp proofing and moisture diagnosis. If you suspect debris, failed insulation or another cavity-related issue, request an extraction or removal inspection. If the cold areas are linked to upper rooms or ceiling edges, explore loft insulation options for your home.
Call Cavi Clear Ltd on 01639790426 to discuss persistent cold spots and arrange practical advice based on the symptoms you have found. Identifying the cause first can help prevent wasted spending and lead to a warmer, healthier home.